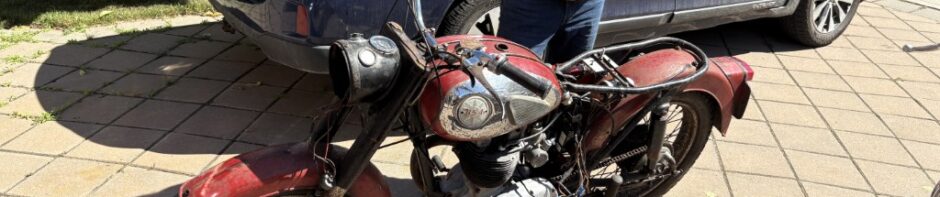
Apparently the best swap sales are in the spring, but I was still waiting on the bike to arrive on the shipment to know what parts I needed. In September I was going to be able to catch two of them.
September was a busy month — I had the chance to hit two swap sales. The one on the left was first, the one on the right still to come.
Mohawk was the first outing. Luck wasn’t exactly on my side, but at least I had Mario along, and that was a godsend. The man knows his parts. I was on the hunt for exhausts, a seat, rims, and even a replacement Ammeter. What did I actually manage to drag home? An old 1961 BSA spec book — basically a paperweight with more dust than answers, but hey, a bit of history for the collection.
Mario, meanwhile, walked off with a full set of chromed dual exhausts for one of his bikes — $50. He didn’t even need them, but he negotiated like a pro until the poor seller caved. Formula for discounting: pretend you don’t want the thing, then buy it anyway.
Mario reckons the supply of British parts is starting to get thin. Makes sense — it’s been over 60 years since these bikes rolled out, after all. The tables were full of Japanese bits and Harley parts, most of which, judging by their condition, probably fell off on the highway and were scooped up for resale.
So, reality check: I may have to look at replica parts over the winter for some of the rarer components. “Made in India” instead of “Made in England.” At this stage, I’ll take whatever works, so long as it doesn’t explode or look like it was stamped out of tin foil.
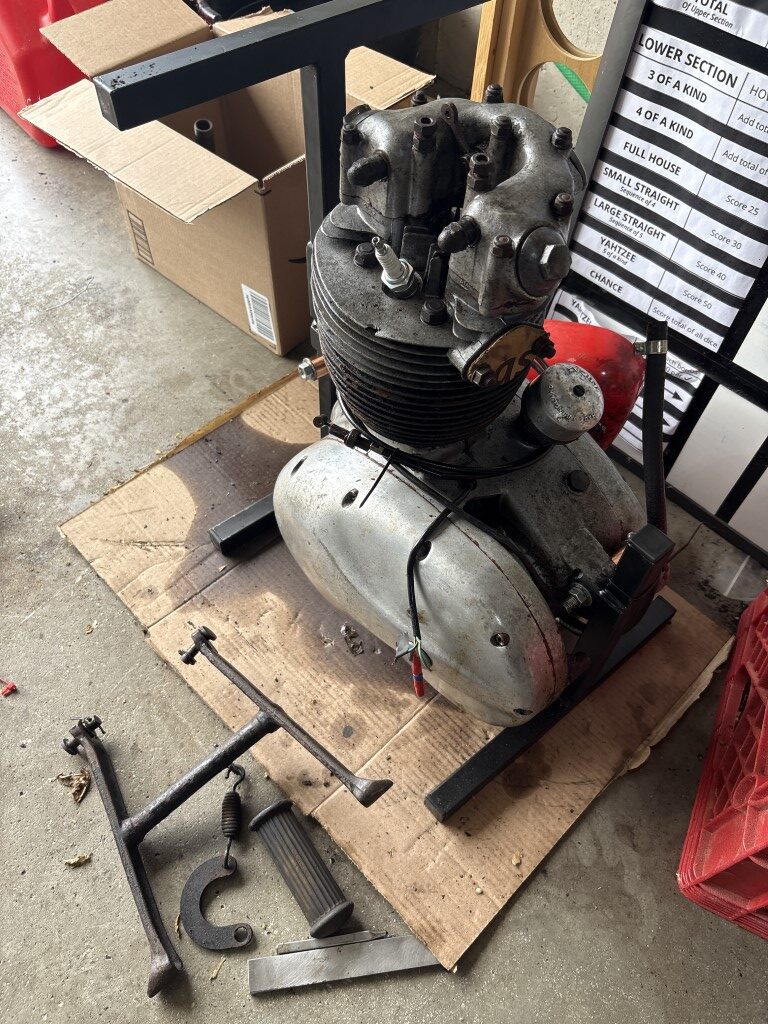
Enough for now — next up: the engine dismantle. It’s already done, but I’ll try to recall the pain without bursting into tears.
Fair warning: it involves seized bolts, questionable engineering, and enough swearing to make a docker blush. Stay tuned.
Course, like anything worth doing, it takes time… and in my case, a few muttered curses and a good helping of misplaced optimism.
First order of business was to get the wheels off the rims and the tubes out. Aye, tubes — remember those? Back in ’61 they actually put a balloon inside the tire to hold the air in. Revolutionary thinking, clearly. Likely the only reason the blessed things were still holding air after 55 years. Fair play to the old rubber, it had more stamina than me.
Before heading off to the swap sale recently, I figured I should at least take a squint at the spokes and how they were mounted. Couldn’t just walk in pretending I knew what I was talking about — though, truth be told, that’s usually my approach to life. So, off came the tires for a closer look.
Now, I’ve done plenty of bicycle tires in my day — usually with screwdrivers and my mum’s best butter knives (sorry, Mum). I was the local bike repair lad back then. Paint a frame, fix a chain, bodge a repair. I was also head demolition expert, but that’s another tale. Anyway, I quickly discovered that my trusty screwdriver wasn’t up to the job. In fact, it was about as useful as a chocolate teapot.
So I asked my mechanic pal Mario how he does it. He agreed to lend me his secret arsenal: three proper tire wedges and his personal BFH — that’s “Big Friendly Hammer” in polite company.
Like a Scotsman at an open bar, I was off.
Attack!
I’ll spare you the details of the huffing, puffing, swearing, and sweating as I tried to balance three tire wedges while whacking away like a man possessed. There are entire YouTube channels dedicated to this lunacy, if you fancy seeing other poor souls suffer. But the good news: I was successful. Even better news: I didn’t put any new holes in the tubes. (The old ones will do just fine, thank you very much.)
The rubber is older than a Highland granny, but I reckon it’ll be good enough to get the bike rolling. Once the test pilot’s done, we’ll swap it out for something a wee bit fresher — ideally before the thing disintegrates mid-ride and throws me (or the wifey) into a hedge.
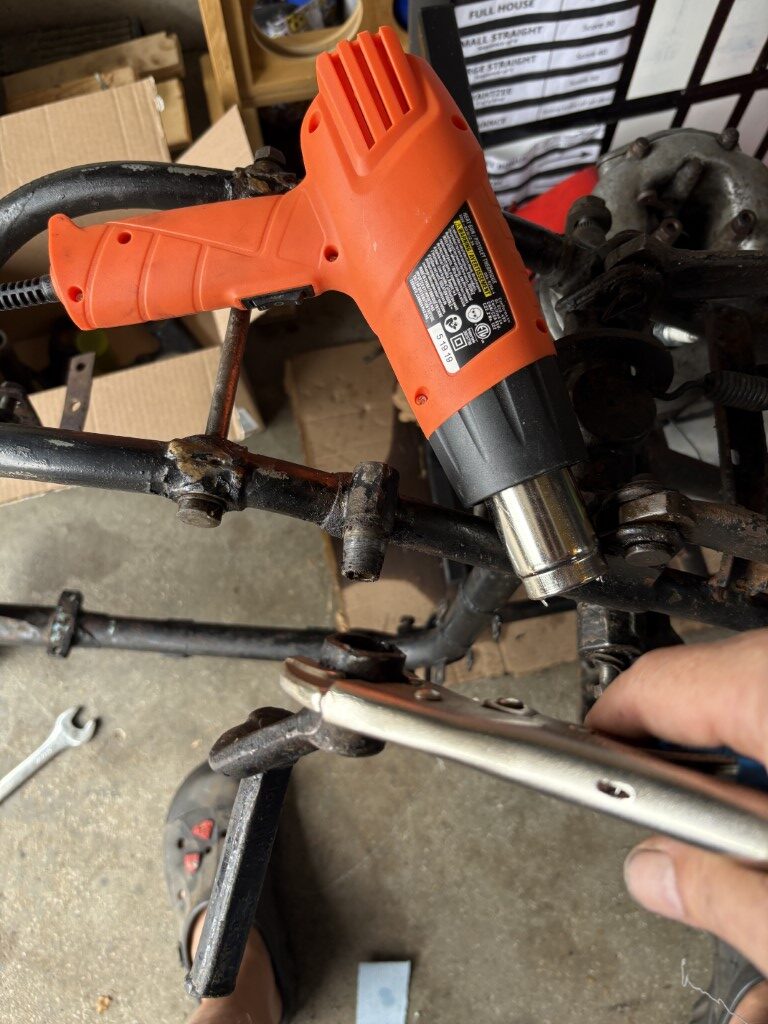
Next came the delicate art of finesse — which in my case usually means brute force with a thin veil of patience. The two hub covers had to come off, and after a bit of persuasion with heat and a pair of wedge screwdrivers (the sort of nail pullers your grandad kept in a rusty tin), I managed to pry them up bit by bit. The heat worked its magic, softening the 50-year-old grease into something resembling day-old porridge, and slowly but surely the covers gave up.
With that, I coaxed the shaft and bearing out of the hub. Well, coaxed might be generous — let’s just say there was some convincing involved. The second bearing I left for a trip to Mario’s, since he actually owns a proper drift for the job. (I’d been about ready to try a tent peg and some choice language, but apparently there are “correct tools” for these things. Who knew?)
I’m down to a couple of tough ones remaining on the dismantle (other than the engine inspection)
Anyway, this race has to come out. Only problem: the frame hole is smaller than the inner race ID, so there’s no handy lip to tap from the other side. In other words, BSA designed it so you’d curse your way through the job.
At coffee morning, the lads told me the trick: put four spots of weld on it and, when it cools, the different metals shrink at different rates and the race just drops out. Aye, right. Sounds like black magic to me. I’d hate to dig out my book on thermodynamics (or worse, ask my wife to explain it).
Plan B: weld a big washer or nut across the race so it can actually be hit with a drift from the back. Or maybe it just falls out on its own when I’m not looking — that would be a first.
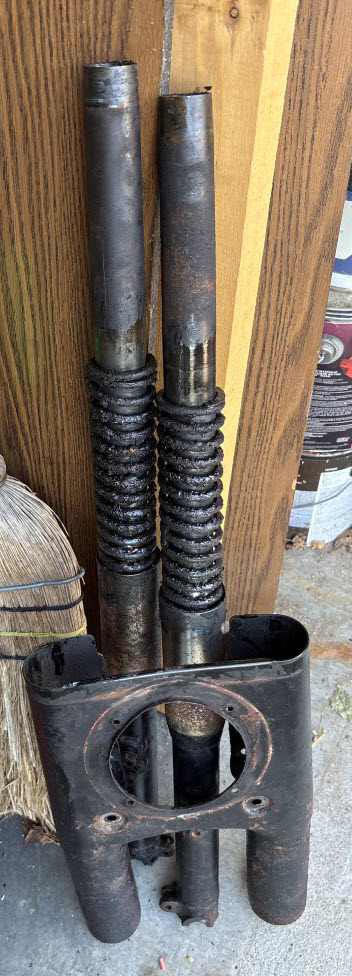
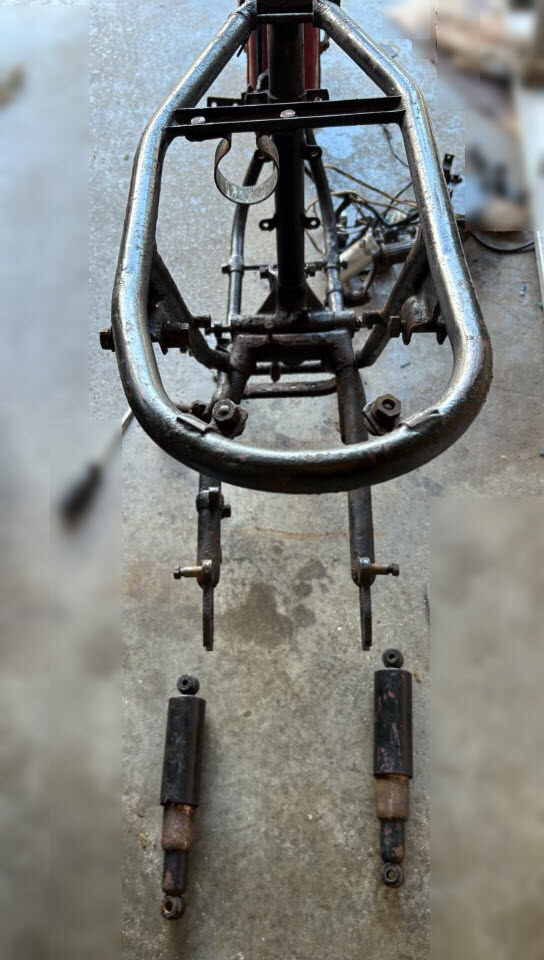
The other job (I did say two remaining) is to get the front and rear shocks broken down. Since the springs are under more force than a Scotsman guarding the last biscuit, special tools are required. Naturally, I’m making my own.
For the fronts, I’ve got to reach way down the tube to hook into those two opposing slots using the tool on the right — essentially a bit of pipe ground with two tabs. Then I can grab it with a plumber’s wrench and twist it free. The “proper” tool for the job is $126 CAD on eBay (plus shipping). Aye, very reasonable… if you’re daft. I’ll be making mine for the price of a bit of scrap pipe and a fresh blister.
The rears are trickier. I need to build a special pipe to compress the spring so the two chrome pieces pop out through the gap. Sounds simple, right? Right. Wish me luck — because the only thing standing between me and a flying chrome projectile is my homemade contraption and blind faith.
If you don’t hear from me again, assume one of the 4 the springs won.
Eleanor and I attended the September CVMG meeting for London this week and presented the BSA project at their request. I brought along the DELL projector I’d repaired a couple of years ago, and we threw our PowerPoint up on the wall. I think it’s safe to say everyone now knows who the “technology people” are… lol.
Attendance was solid, and folks seemed genuinely pleased with the story, the details, and the progress (or at least the drama) of the B40. I shared a link to the blog so they can subscribe and follow along—assuming, of course, they can wrestle with the mysteries of the internet.
A great side-effect: now everyone knows what’s on my parts shopping list. That means more eyes on the hunt! Pete, one of the members, even mentioned he might have a silencer (aka muffler) that would fit. If that pans out, all I’ll need is the connecting pipe from the engine to the silencer—whether that ends up being found, bought, or fabricated. Either way, it feels like a promising lead.
Speedometer drive
The BSA B40’s speedometer drive is one of those little gadgets that you don’t think much about—until it isn’t there. It’s a Smiths-style mechanical unit, tucked away on the rear wheel axle, quietly converting every turn of the wheel into a spinning cable that feeds the speedometer.
Inside, a drive ring turns a worm gear, which spins the inner cable, which spins the speedometer needle. Simple enough in theory. In practice, it’s a fiddly piece of kit that can slip, bind, or just decide it’s had enough after 60 years of service. Many riders from back in the day will remember watching the needle bounce around like it was measuring earthquakes rather than road speed.
But when it works, it’s a clever little link between man, machine, and velocity—one that was shared across many of BSA’s unit singles, including the B40. And it’s matched to magnetic Smiths speedometers, which means the right drive ratio, cable, and sleeve nut all need to play nicely together.
When I got this bike, the speedometer cable was already disconnected. That makes me wonder if my late father-in-law had already had his own battles with this setup and decided to quietly declare a truce. Time will tell—my next step is to hook the cable up to a drill and see if the speedometer needle even twitches. If it doesn’t, well… that’ll be another chapter in the saga.
So, while some might dismiss it as just another widget, I like to think of it as the unsung hero that keeps you from being “that rider” explaining to the constable, “Well officer, I didn’t realize 45 felt so much like 65.”
My goal here was to remove the speedo unit so that I could remove the then sheet metal decorative cover. Would be required to access the spokes if removing and needed to clean both. It should just slide up, but I struggled to gently pry it with 2 and 3 lifters. After discussions with everyone gentle pressure, light oil, persuasion was the suggestions (no tricks) and don’t use heat or break the unit… OMG
Speedo to be continued.. Friend arrived for a late afternoon Virtual Pinball competition in the basement… BSA later.
Saturday.. continued
One thought I’m entertaining is the idea of sandblasting and powder-coating the existing rims, spokes, and center hubs. That would give me a solid “version 1.0” of the rebuild—good enough to get the bike rolling and respectable—while I keep hunting down new chrome rims for a proper “version 2.0.” The math is simple: rims are about $150 plus shipping each, then I’d still need new spokes, a cleaned-up hub, and someone skilled enough to true the whole assembly. Powder-coating what I have now could save a lot of time and money while still looking sharp-ish.
My BSA friend Mario (from CVMG) offered to loan me his professional tire removal tools, so when we met up at the weekly McDonald’s coffee gathering, we did the handoff in the parking lot like a couple of shady parts dealers. We’re also heading together to the Mohawk Racetrack swap meet on Sunday morning—perfect timing to strip these tires off and see what I’m really working with.
Side-tracked: Of course, before I can focus on the BSA, my neighbor Cal roped me into helping with his “new to him” 1982 Yamaha XS400. He recently got his M2 license and was excited about his vintage purchase (yes, it technically qualifies now—yikes). The problem was it refused to start, either on kick or electric. He’d told me the electric starter didn’t work, but I suspected it was more a case of a weak battery than dead electronics. Sure enough, after a night on my trickle charger, I hit the button and it fired up. We used our planned time and tackled a front brake job and made a punch list of what he’ll need before a Service Ontario inspection. A good day’s progress for him.
Now—back to the BSA. Tires to come off, and time to put that speedometer drive mystery to the test.
The tools are in the collection of images above—the pry bars and the hammer for breaking the bead (or persuading stubborn rubber to move when needed). They worked beautifully, and the job went surprisingly well. The rubber is in decent shape, but I’ll definitely be scouring the swap meet for tires that are a little younger than half a century old. Still on the to-do list: getting the bearings and shafts out of both wheels.
I set up the rear wheel on a 4″x4″ block and was able to drive the shaft down, which let the speedo drive pop right out. (Naturally, I only remembered to take the photo after flipping the rim around—classic move.)
Both tubes look fine—one even has an old patch—but since they’re holding air, I’m calling that a win.
As a bonus, I also managed to wrestle off the decorative hub covers. That took some creativity: two nail puller tools working around the edge while I blasted the cover with a heat gun to soften the ancient goop holding it in place. A few bent edges near the spokes needed some coaxing too, but eventually they surrendered.
After a few hours I had both rims broken down. One still has the shaft and two bearings stuck inside, while the other is clinging to a single bearing. Looks like it’s time to invest in some proper tools—brass drifts and bearing installers—if I want to finish the job cleanly.
And yes, at this point I think the bike is keeping a running tally of how many tools it can trick me into buying.
So that’s where the B40 saga sits for now: parts spread across the bench/floor/garage, bearings still to be evicted, rims stripped down, and a speedometer drive that may or may not cooperate when I spin it with a drill. It feels like progress, though in the same way a Highlander might feel “progress” climbing Ben Nevis in the rain—you’re not sure if you’re winning, but you’re definitely wetter and tireder than when you started.
Still, every step forward matters, and with swap meets, kind friends lending tools, and the occasional bit of stubbornness, this old BSA will come back together. In the meantime, I’ll keep smiling, keep hammering, and keep reminding myself: it’s only vintage motorcycling—nae brain /brian surgery.
Or as a Scot might say, “If ye cannae fix it wi’ a bigger hammer, maybe ye dinnae own enough hammers.”
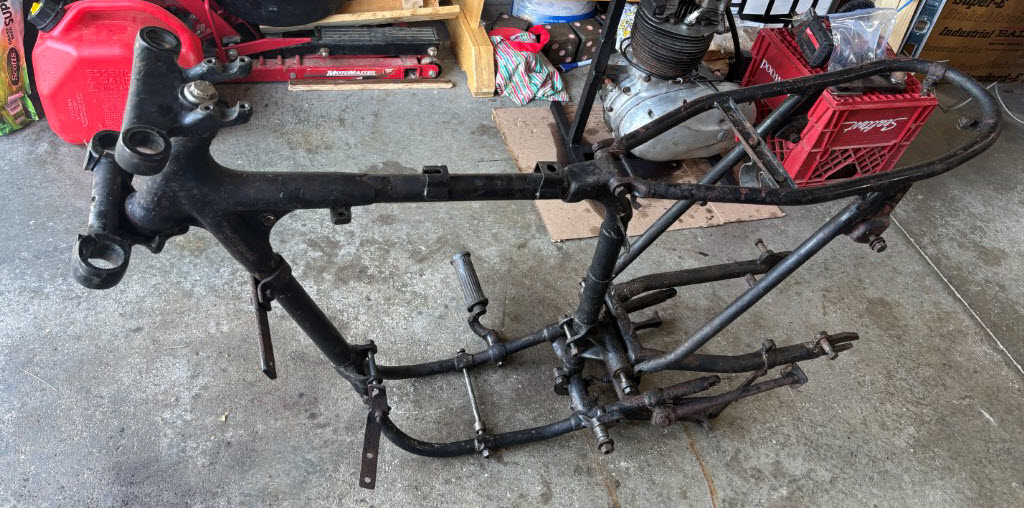
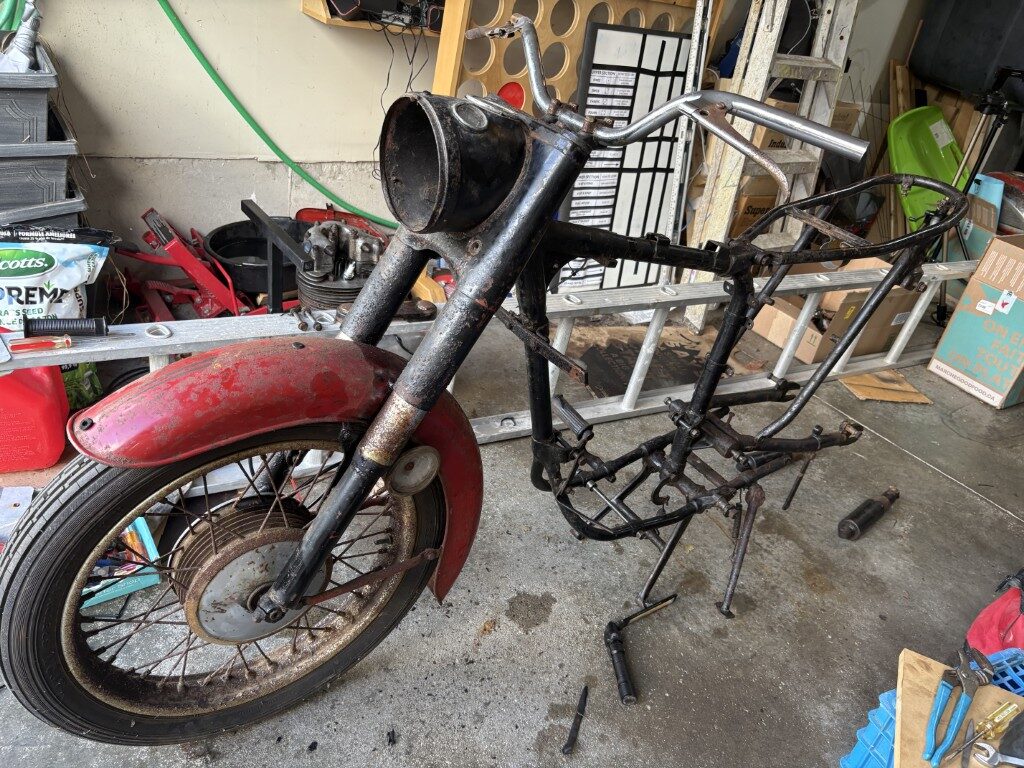
So, progress today — I managed to get the frame down into its 3 major pieces. Not only is it now ready for powder coating (should I decide to get fancy), but I can also say with a straight face that this motorcycle is now officially ready for the prep to enter the next 50 years. Whether I will be is another matter entirely.
I also tackled the front wheel hub. Here’s how it went down:
Front wheel Hub / brakes
This is the circlip after removal. Finding the holes in it required more cleaning than I’d like to admit — let’s just say the last person in there was probably still listening to The Beatles on vinyl. Once located, I gave it the screwdriver + pliers treatment. (Think surgical precision, but with more swearing.)
Out will come the bearings next (another day)… at least in theory. To hold the shaft steady, I used my vice, some 2×2 wood pieces (yes, that’s considered “precision engineering” in my garage), and hit it with my trusty electric heater. With a plumbing pipe extension on the wrench, the nut finally surrendered — apparently convinced that resistance was futile.
Springs and shoes followed. The toughest bit? That one pin that doubles as the brake cable guide. I’m convinced the engineers at BSA made that part specifically to test my patience. I almost succumbed.
Frame from 1 to 3 pieces
Next job: splitting the frame. (A, B, C) It pivots at two points, so it was just a matter of driving out a pressed-in tube with a screw, a 5 lb persuader (a.k.a. mallet), and the usual accompaniment of heat. Success!
The bolt holding on (B) to (A) was a bolt and nut but it passed through a tube which was pressed in through the two side arms as well as through the core Frame. I found a screw that had a head which was just smaller than the frame but the thread went into the tube. I used this to drive the tube out using a screwdriver and 5# mallet (persuader) while supporting the back and applying heat with my electrical heat gun. — Success
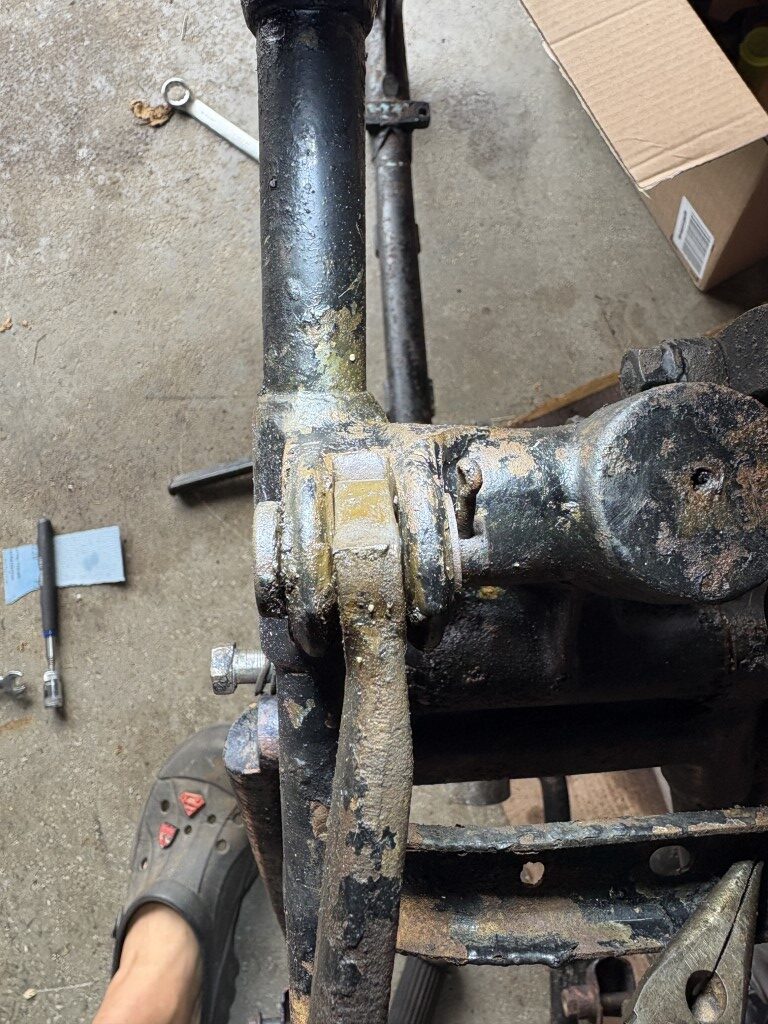
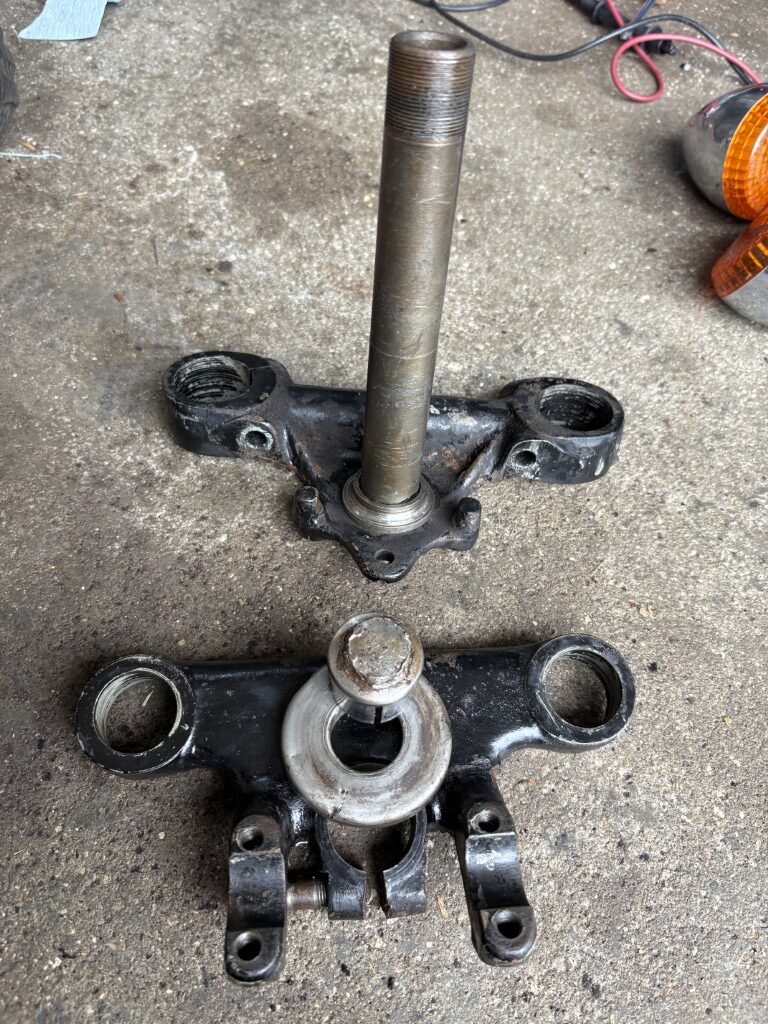
Next came what I figured would be the most difficult. The Swing Arm Spindle. In the two ends of the swing arm are bronze bushings which the thin bushing can be seen in the two images below showing the spindle end where it accepts the bolt. I found a socket that is a smaller diameter than the bronze bushing, but will push the spindle end. On the bottom I put a socket large enough to accept the shaft as it would come out.
I was intending to use my heat gun but my neighbor had a very handy small propane blow torch so we used that and with 4 hands he could be “heat man” whilc I was BFH man. I destroyed one socket (although I think I can fix the end with a grinder) while pounding, but after continuing with heat and shock waves the shaft started to move. Once it moved a little then it had to come out. Few repositions to get more height for the shaft and quite a few smacks it left it’s home for the past 50 years.
The Service Sheet Revelation:
Turns out my frame (B40-1296) predates a later revision. The manual actually recommends drilling two new grease nipple holes and plugging the old one. Sounds like a weekend project waiting to happen. (What could possibly go wrong with me and power tools?)
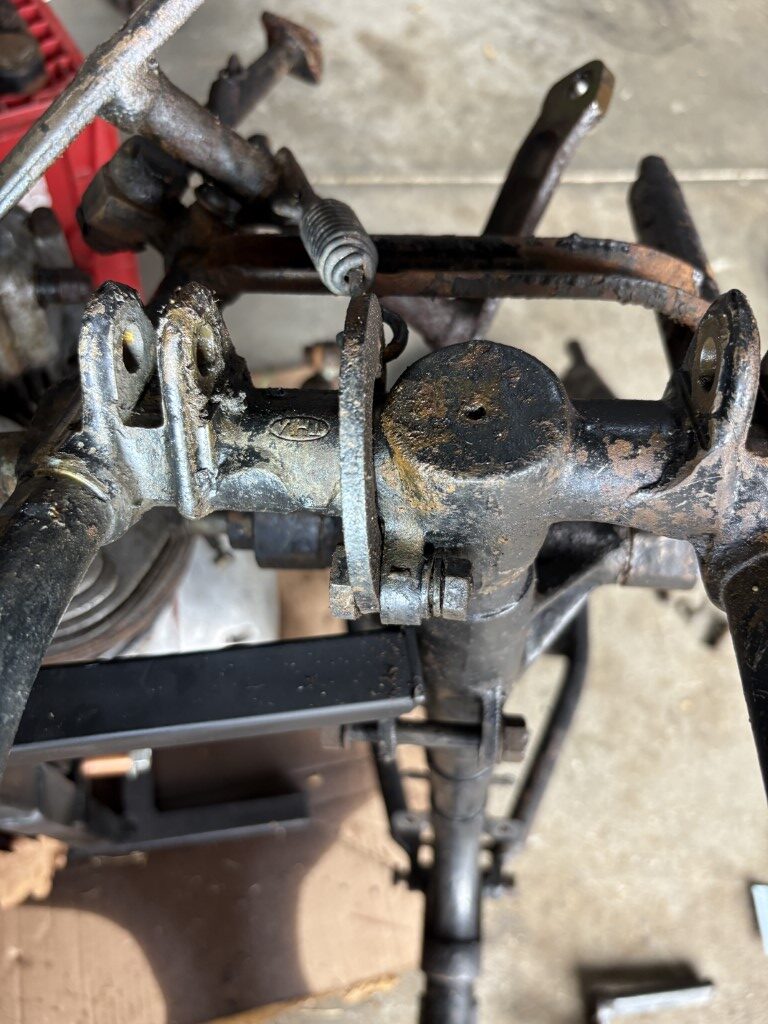
In this photo I placed the swing arm spindle back in the swing arm and placed in on the frame to show where it would pass through. You can see the single grease nipple which is offset and might struggle to push grease to both bronze bushings.
The retrofit would be to drill two nearer to the bronze bushings to better allow each bushing to be greased.
Blow Torch – Reference
Not the same Bernomatic brand, but the hunt is on now for a Birthday Present for me :o)
Was tackling yesterday an issue with the Vulcan 800. Had to 3D print some new components for the rear signals, but that’s another story and maybe I’ll post about that, but want to stay focused on the BSA here.
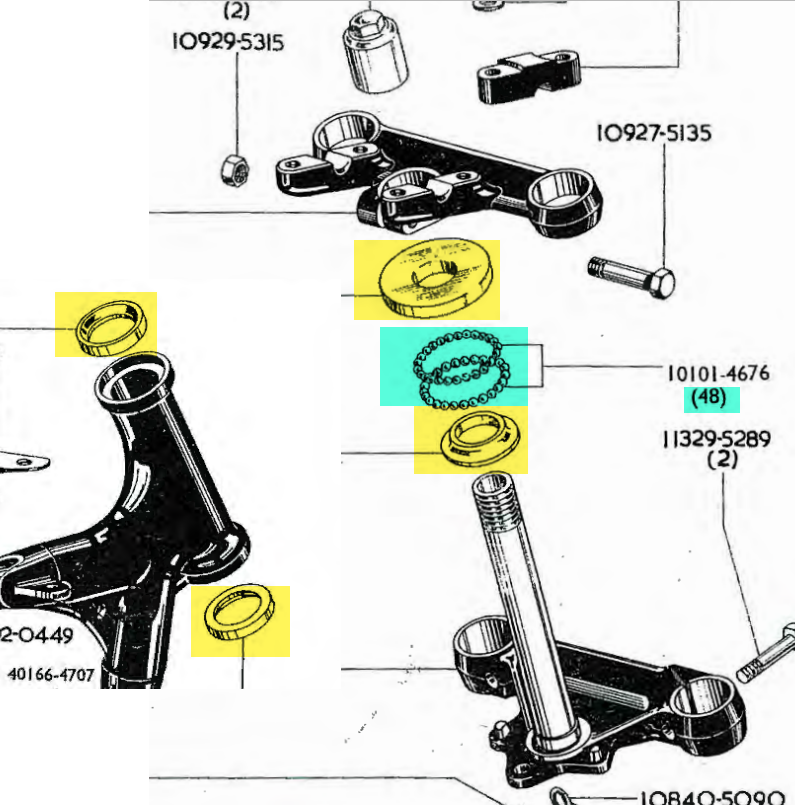
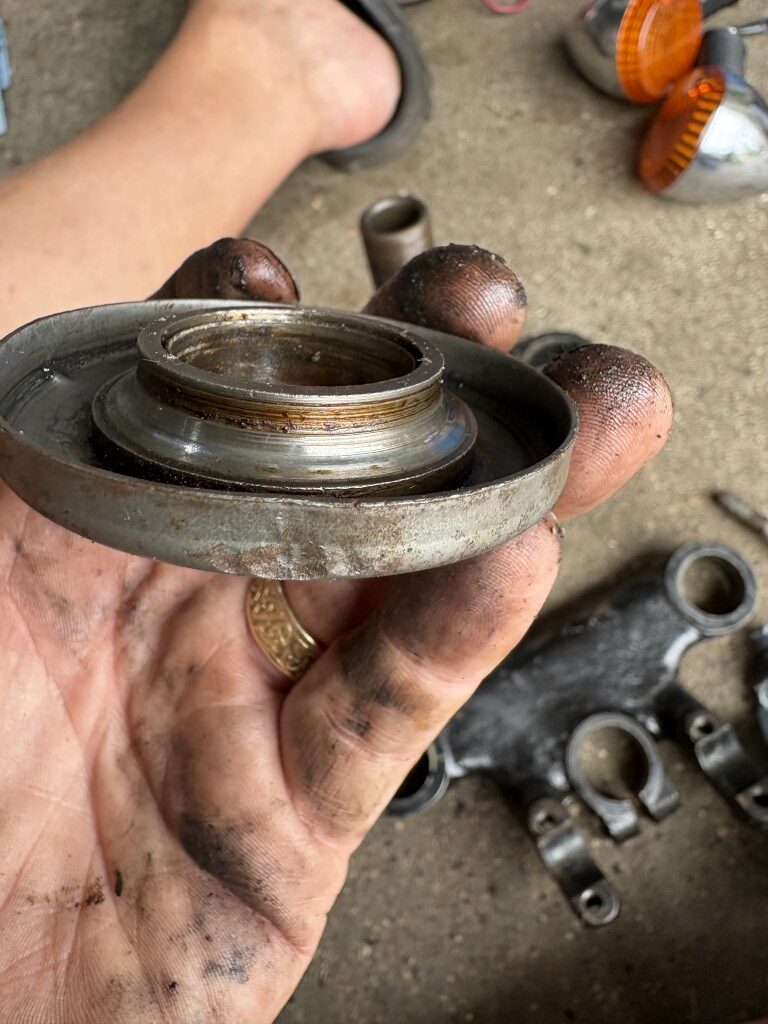
Today I wanted to get ready to rebuild the front end so had to complete the disassembly. Since I’m down 3 bearings of the 48 and likely the ones left are bad I’m planning 4 new bearing races and new ball bearings. For this I had 3 of the 4 races that need attention.
To the left you will see the race is now dropped from it’s original location. With the neighbor we put it vertical in a vice and then used his torch to heat up the race. Once glowing we poked a flat screw driver in the top gap and it fell from it’s location.
You can see a slight step so putting the new race on it will be critical to get the right size pipe to assure even pressure. Another day.
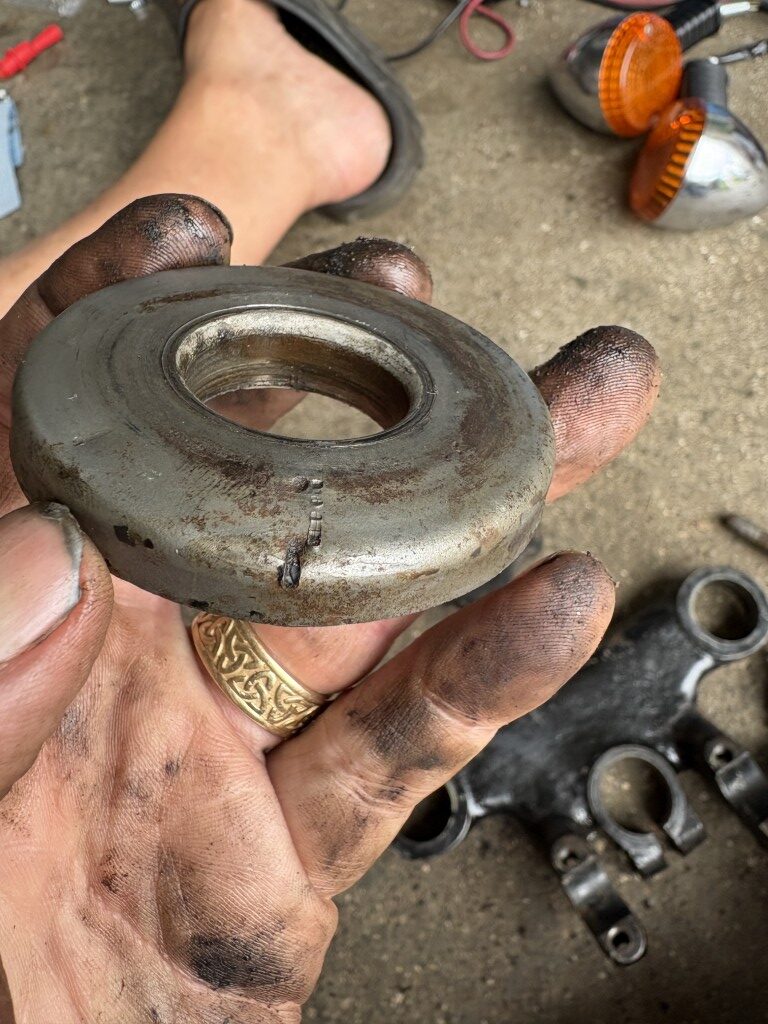
This is the 4th bearing race which is at the very top of the swan neck and it has a decorative dust cover on it, so this is a direct order / replacement.
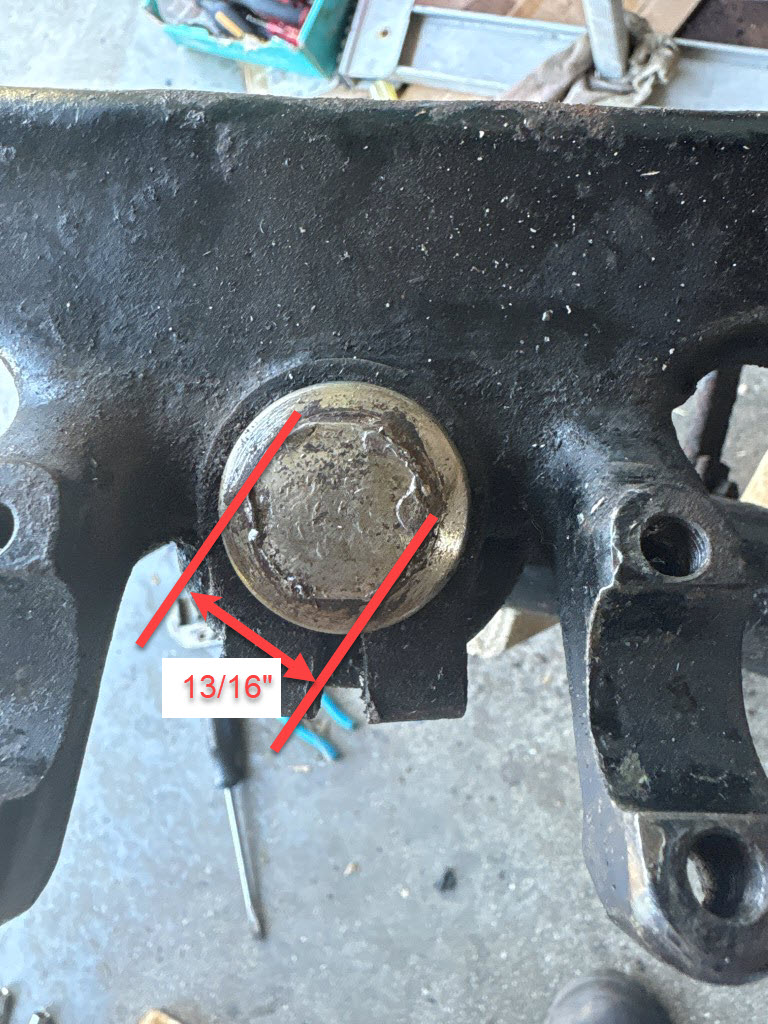
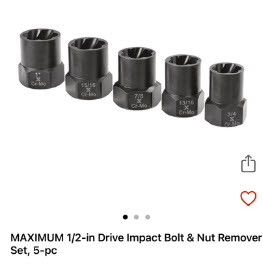
The Nut to be removed is shown in the above in yellow and in the actual image to the right. It’s being very stubborn and I was starting to think it was a LH thread, but seems that the foot peg Nuts have an LH stamped on them and this Nut does not. All signs point to it being just stubborn so tomorrow I go to Crappy-Tire and purchase a 1-1/8″ deep socket 1/2 drive so that I can use my pneumatic impact gun.
I found a similar video as it’s a BSA A10 and not the B40, but the wheel is identical and the 7″ FULL Hub, so I suspect it’s relevant. He has a series of these videos on his bike, so will be going through them to see what is relevant. I’m considering doing some videos in the future and edit them down to relevant content.
The front hub is similar to the rear hub was and needs to be cleaned and freed up, so I must make entry :o)
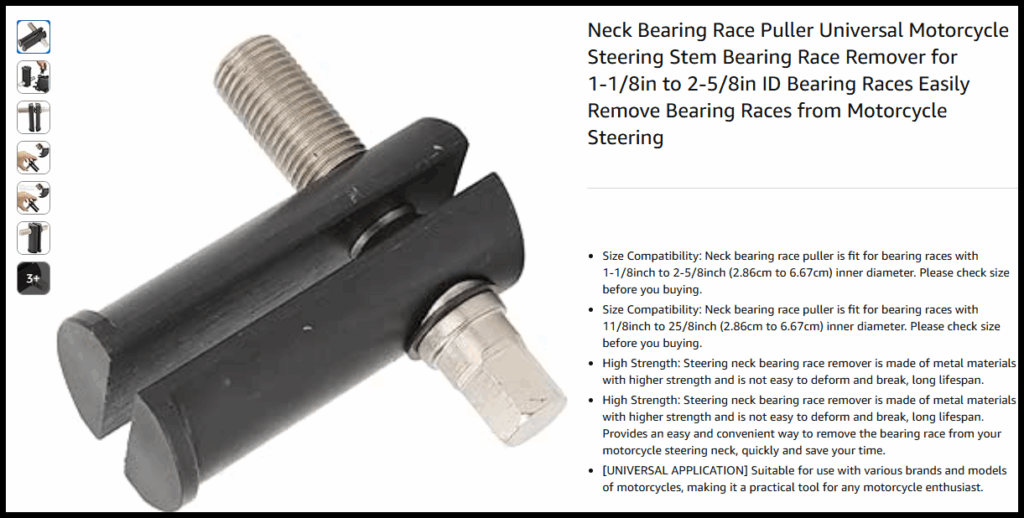
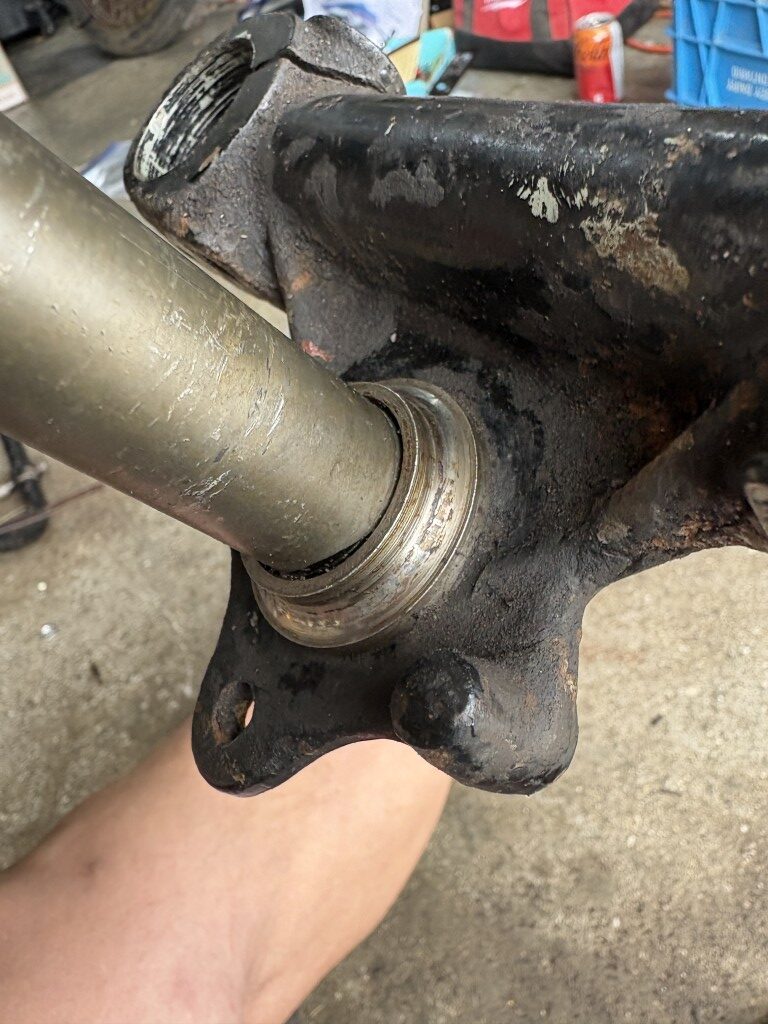
As for the remaining bearing races in the swan neck I’ve ordered the above tool from Amazon which can be used grip the small edge of the race in the neck pipe and then it can be drifted from the other end with a persuasive BFH. My opening is 1-1/4″ so this one should work fine and my neighbor can borrow it in the future for his Vintage BMW.
Another future consideration is whether to remove the swing arm assembly. The arrows point to where there are bronze bushings and the red line is where a spindle goes through.
I’m going to investigate this more as right now the swing arm is moving without any trouble and this assembly might not be worth the rebuild now. The spindle might be useable, but the bushings might need to be replaced and then honed to be true. I also found there was a service bulletin shortly after this frame where they changed from the one grease nipple shown to two at the outer edges… this might be a future strip down and winter repair if it gives trouble… still time to think.
BTW.. the reason for consideration was for powder coating if I went that way as the heat and process might cause issues. I read in this bronze assembly it’s unlikely, but future methods changed where a rubber bushing was within that could melt.
Swap meets coming up, so need to focus on making a list of components I’m looking for and get some basic measurements. Sunday Sept 7 and Sunday Sept 28th… fingers crossed.
We last left our story where I was contemplating how to remove the foot peg now that the reverse-thread bolt had been conquered. Several whacks with the BFH (Big F@$#% Hammer) had already been administered, but the peg responded with the enthusiasm of a teenager asked to mow the lawn. A good night’s sleep seemed wiser than escalating to arson with a blow torch.
Enter the heat gun. Not the kind of blowtorch you see in proper garages—no, this was the Princess Auto shrink-wrap special. Normally used for scaring plastic electrical tubing into submission, today it was promoted to “fire-breathing dragon.” A little heat, a twist with the vice grips, and—presto—it surrendered without another whack. The BFH sat sulking in the corner, muttering about “how things used to be done.”
Feeling smug, I moved on to the center stand and side-stand. Both were coated in what can only be described as “archaeological grime,” possibly dating back to when Elvis was still touring. They eventually came off, leaving me with photos that look suspiciously like the “before” side of an infomercial.
Next will come the bearings. Oh, the bearings. Forty-eight ball bearings were promised, but only forty-five were accounted for. Three apparently decided to defect—possibly still rolling back in Scotland living their best lives. (If found, please return immediately. Reward: one free sarcastic comment.). I still keep my eye’s peeled for them, but would not be wise to re-use them after 65 years.
Advice from a friend suggested a few light taps should free the bearing races. “Light taps” always sounds easy when it’s not their knuckles on the line. I’ll save that fun for Saturday, when I’m braver or at least more caffeinated. Today I called it a day’s worth of success.
Finally, I began the great “paint vs powder coat” debate. Got a quote of about $300 to sandblast and powder coat the frame, which sounds fine until you remember I could buy an entire running Honda for the same price. Discovered that dry ice blasting is mostly for aluminum and flaky paint removal. Translation: yet another thing YouTube made look way cooler than it actually is.
I don’t think that I shared, but one of my boxes has the entire electrical system in a box. At one point I’ll lay it out on the basement floor and the inspection and prep will begin. Figure lots of solder to fix and wire ends to replace. Even some connections to redo.
So, today’s progress: fewer brute-force hammerings, more accidental science experiments. The saga continues…
Who knew restoring a BSA would be 10% mechanics and 90% Googling creative ways not to bleed? H played nurse and I have an unphotographed Band-Aid on my finger… fortunately she said it’s got 60% faster healing properties to ready me for the next slip….
The story continued today, but first was a shopping trip this afternoon with Holly to get some necessary components. I worked on the rear signals for the VN800 (’98), which now officially qualifies as “vintage” — not because of its styling or heritage, but because it creaks louder than I do getting out of bed.
In Ontario, the closest official definition is a “historic vehicle,” which must be at least 30 years old and largely unchanged from its original manufacturer’s product. While no specific “vintage motorcycle” legal definition exists, insurance companies and enthusiasts often consider vehicles over 25 years old to be “classic” or “vintage,” though definitions vary. Personally, I just go by the definition of: if the parts counter guy laughs when you ask for a replacement, it’s vintage.
Canadian Tire sold a set of their Extractors today which included the 13/16 size. With my pneumatic 1/2″ drive impact gun and some penetrating oil the nut finally gave up and the assembly fell apart. This is the point where the ball bearings scattered like confetti at a divorce hearing. I collected them, but in the end I have 45 out of the total 48. Many were stuck in the grease, and a few are now on extended vacation somewhere in the garage. Odds are I’ll find them months from now when they lodge in my shop vac hose or press into the sole of my foot.
The 3 missing bearings could have been casualties of time (disintegrated to dust)— or maybe they’ve already unionized and walked off the job in protest of poor working conditions. The upper race has dings, the lower has pits, and overall it looks like the bearings spent the last decade working as a rock tumbler. Replacement seems inevitable, which means I now get to research “fun things to do with a press and a blowtorch.”
This then brought me back to the footpeg on the Gearshift side of the bike (right). I managed to get the socket on the bolt end, and with the impact gun I cycled back and forth until it finally moved. Of course, it turned out to be left-hand thread. Righty-Losey, Lefty-Tighty… opposite. Nothing like questioning your entire life’s training in a single turn of a wrench.
Now the pedal itself appears stuck, likely on a tapered post. I’m debating if I should even bother removing it, since its main function at the moment is to introduce new bruises to my shins. If I leave it, at least I’ll always know where my shin bones are by the roadmap of purple welts. I did remove the rubber from the peg though, so progress… technically.
I now have an assortment of cardboard boxes breeding in the garage, each one containing a different section of the bike — like some sort of greasy advent calendar where the surprise is usually rust. Soon it’ll be time to start the part-by-part march toward recovery. A slow march, mind you… more like a good Scottish dram: steady, stubborn, and just cheerful enough to keep going despite the rain.
So that wraps up today. Three ball bearings on the lam, a left-hand thread that mocked me, and a shin that’s already filing a complaint. More fun to be had in the future… because apparently, I enjoy this sort of punishment.
Today was a bit of networking to begin. Headed with my neighbor for a motorcycle ride to Chatham (103km) for breakfast with the CVMG (Canadian Vintage Motorcycle Group) members at “HUNGRY MAN’s” Family restaurant. Was a good meal and we had a nice ride back along River Line.
As for the BSA I continued today in the afternoon and goal was to remove at least the shocks and the sheet metal cover.
Starting with success this time you can see that I have removed the two shocks and the sheet metal.
I supported the front with a 4×4 cut to length to keep the ends of the forks slightly elevated off the floor.
I screwed in the nut to the top of the shock and then backed it off just one turn. I think used a 2×4 and applied some persuasion in the downward direction by laying the 2×4 on top of the nut. Once it dropped and closed the gap then I loosened the nut more and continued.
The shock slowly released from the taper fit and I was able to pull it out completely. The 2nd one (left) was slightly more difficult, but the same process worked and soon the two shocks were out and the sheet metal cover was released.
Pressure washing the frame in the driveway now that all the components are removed. Makes it a bit cleaner to handle as I get ready to strip it down for painting.
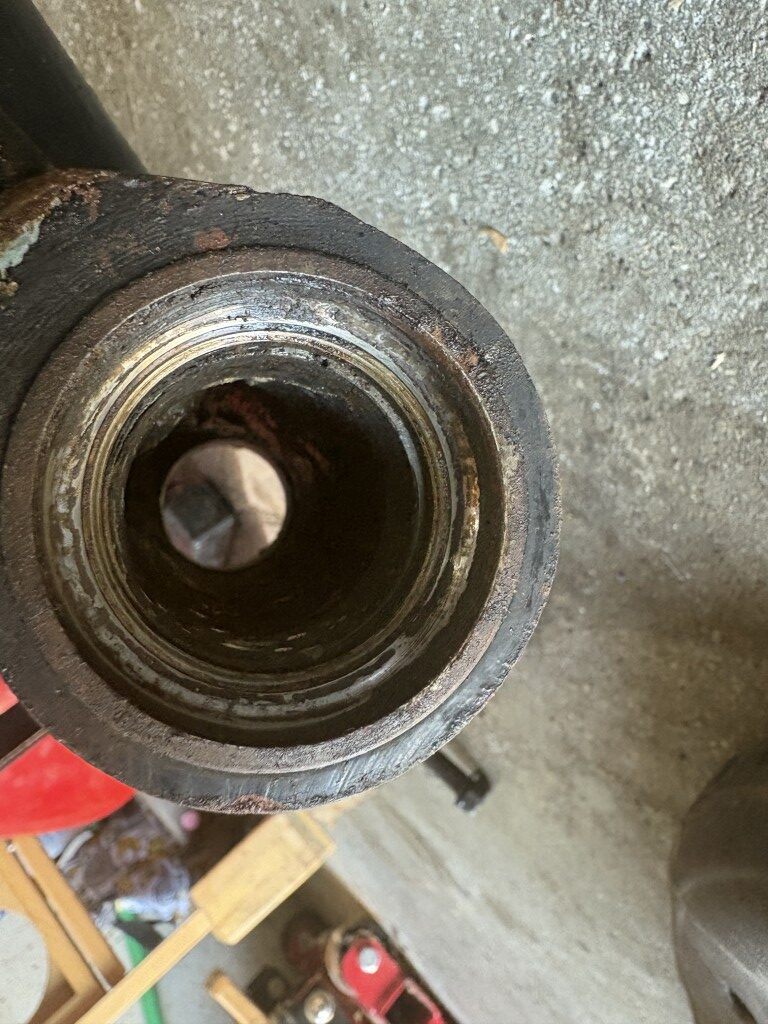
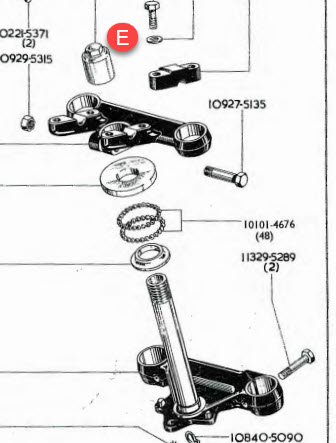
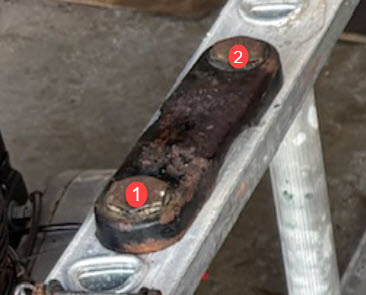
Tomorrow I plan to get apart the above assembly. I believe this was disassembled before as the component (E) already had rounded corners and the wrench was slipping. It’s rounded now that it will need to be replaced so tomorrow I’m going to consider some nut extractors or weld on a 5/8″ nut which can be used to get it moving.
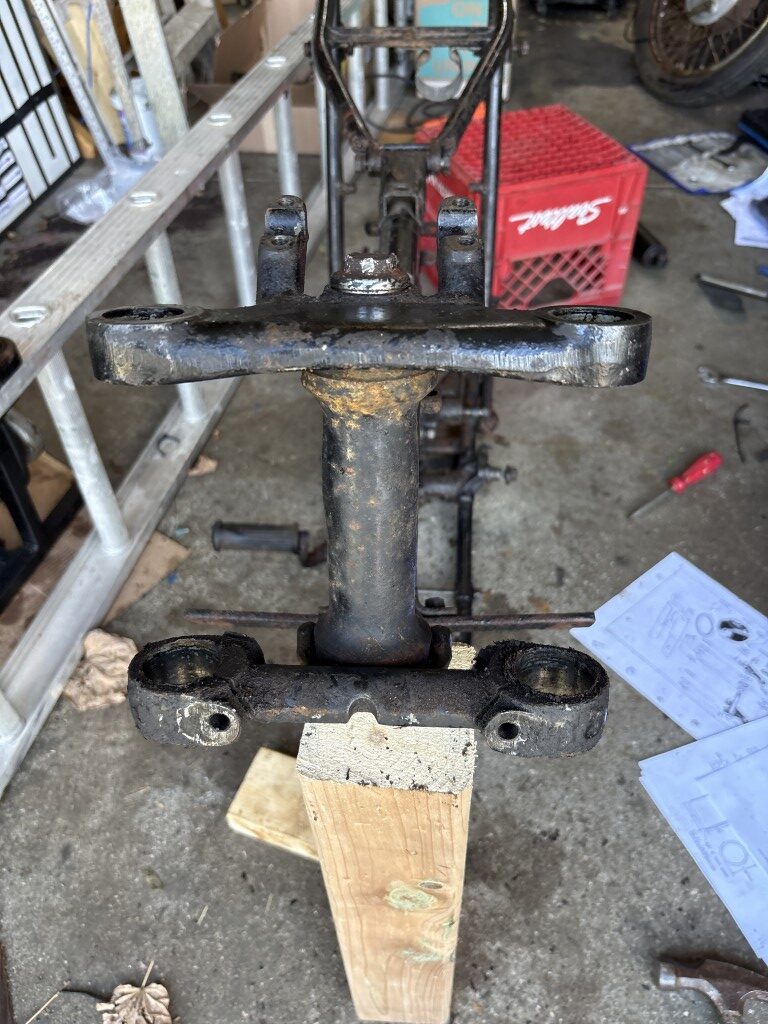
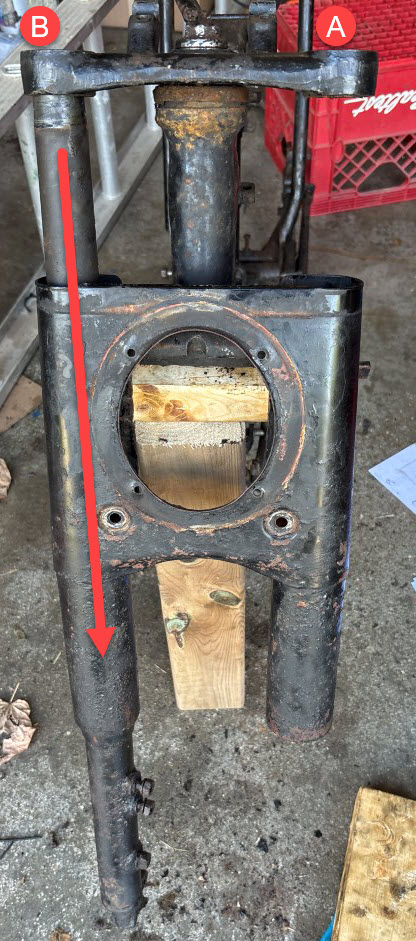
Goal was to strip down the front end and be left with both (A) and (B) as the front suspension removed from the assembly.
…
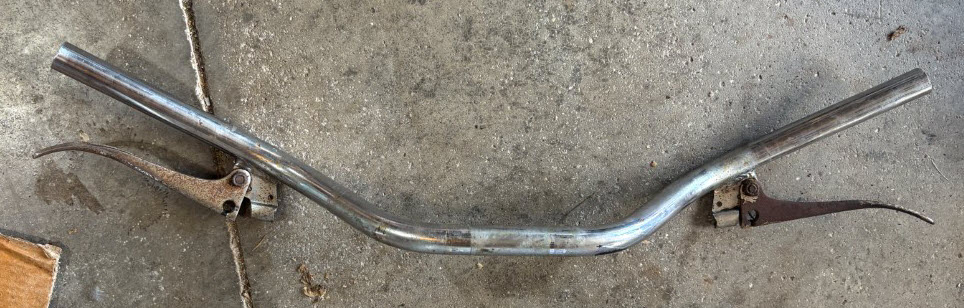
Removal of the handlebars did not pose any issue (easiest part of the day).
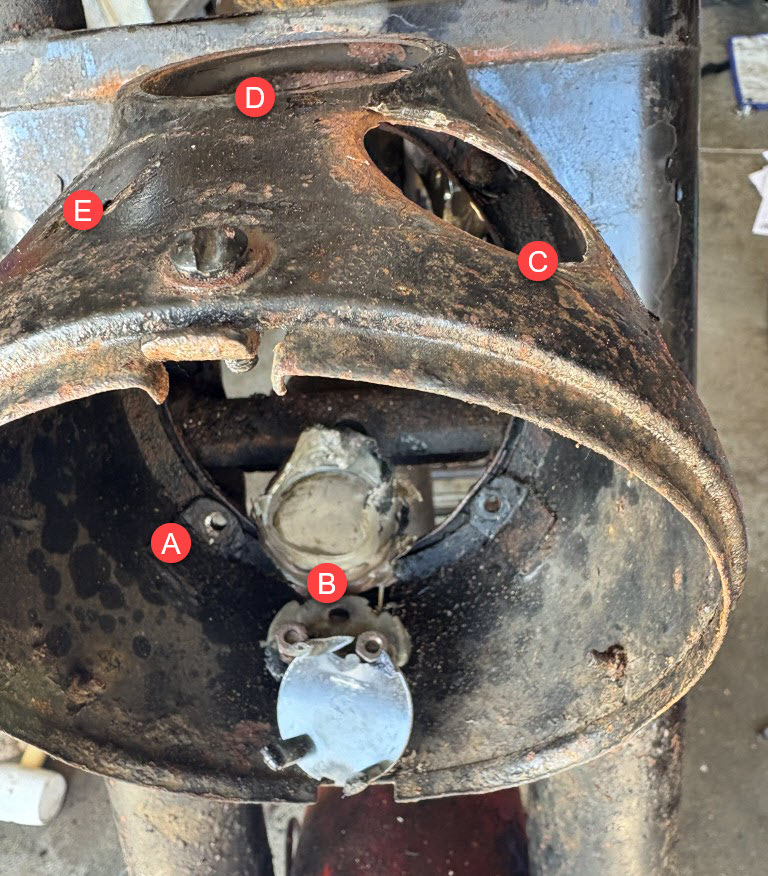
The sheet metal (C) will not slide up over or down so essentially the suspension should be removed first.
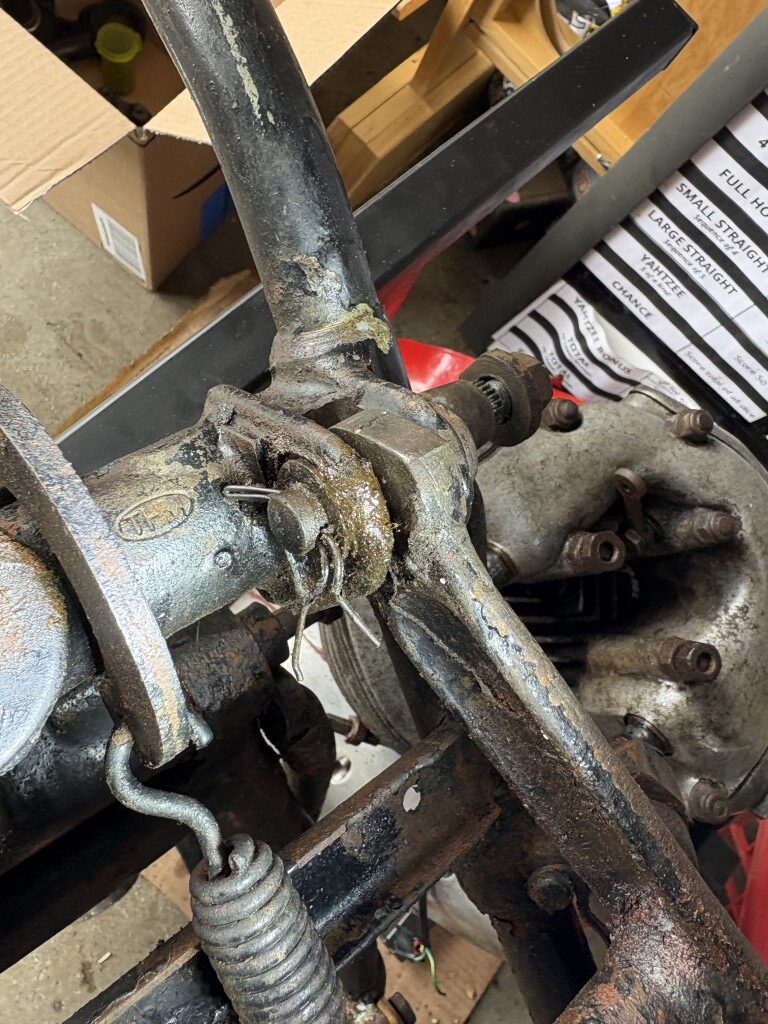
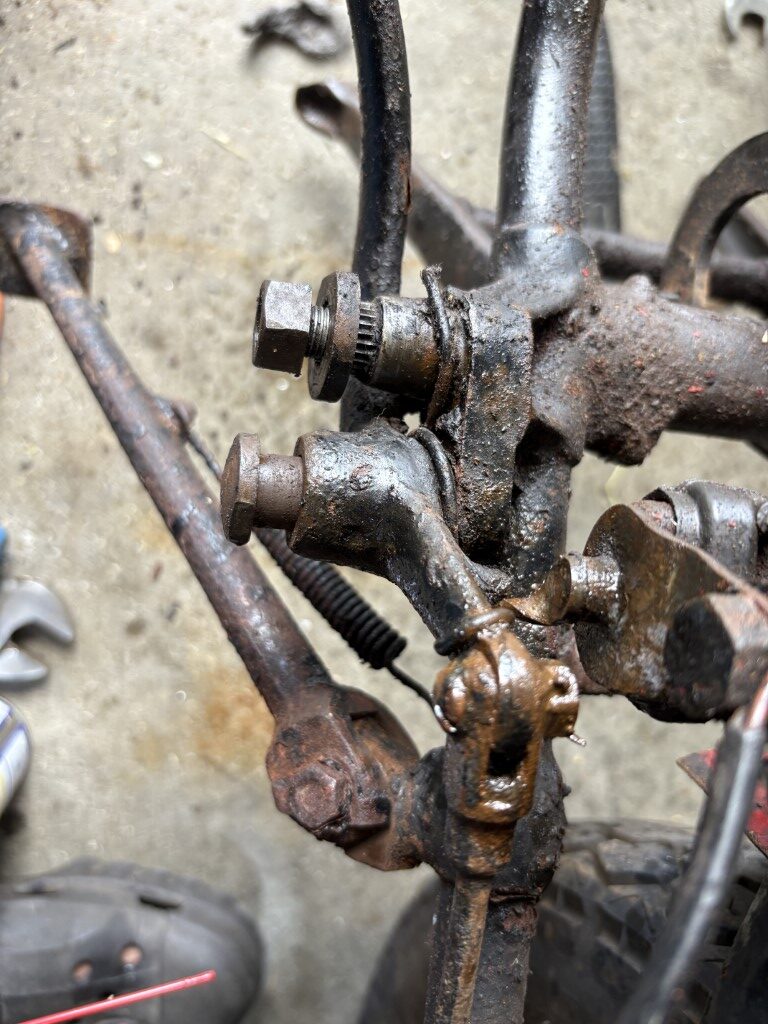
I was looking to remove the Nut at (E) which would allow the top part of the steering yoke to be removed vertically up (allowing (C) to also slide up and over), but after speaking with Douglas Jones his suggestion made the most sense.
The Handle Bars. Need to remove the brake and clutch handles.
Per Doug’s suggestion I will take the nuts removed earlier from the tops of the tubes and use them to remove the suspension tubes. I will thread them back in down to the bottom and then back them out just 1 thread to keep maximum thread engagement. I can then use a piece of hardwood on top and pound them down (proper assembly support) to push them out of the taper wedge. This can be done for each and should help remove them from the assembly.
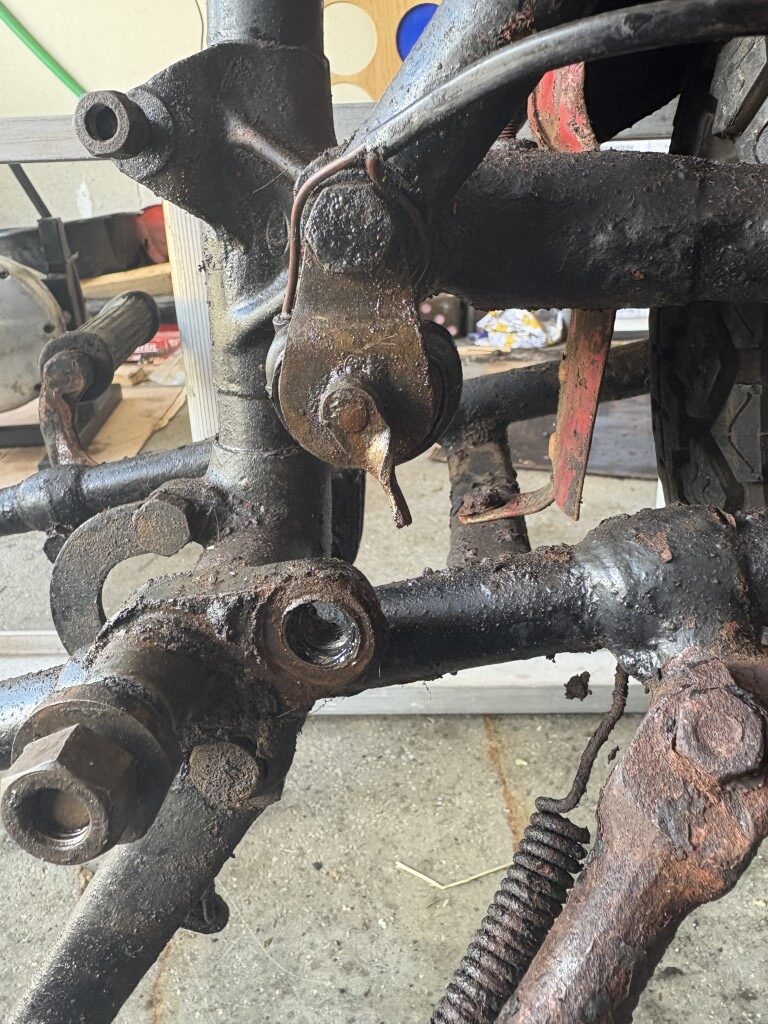
With the tubes out of the assembly the sheet metal (C) will slide down and leave (D) and (E) to be removed next.
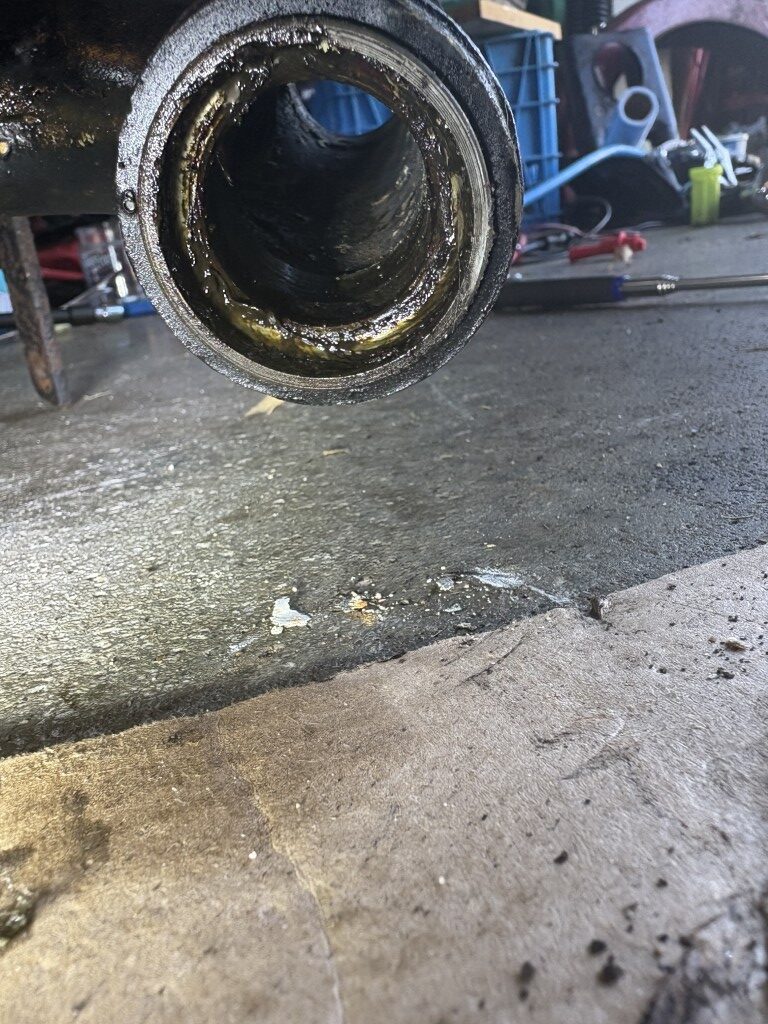
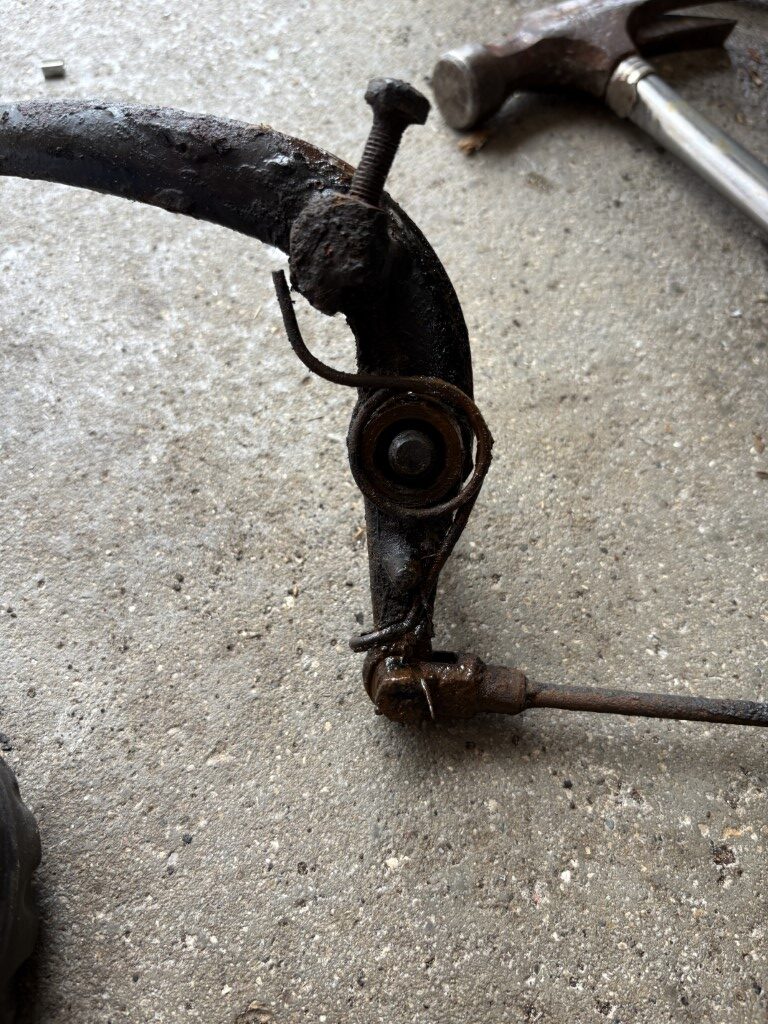
The nut (E) is now rounded and already the wrench was slipping. (some corner metal was left in Scotland) Will likely need to have help from the neighbor to weld a large nut onto the top of the component (E) so that my impact wrench can be used to release and disassemble the stem.
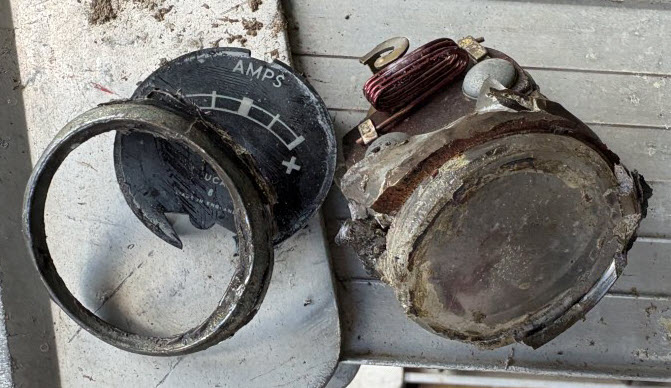
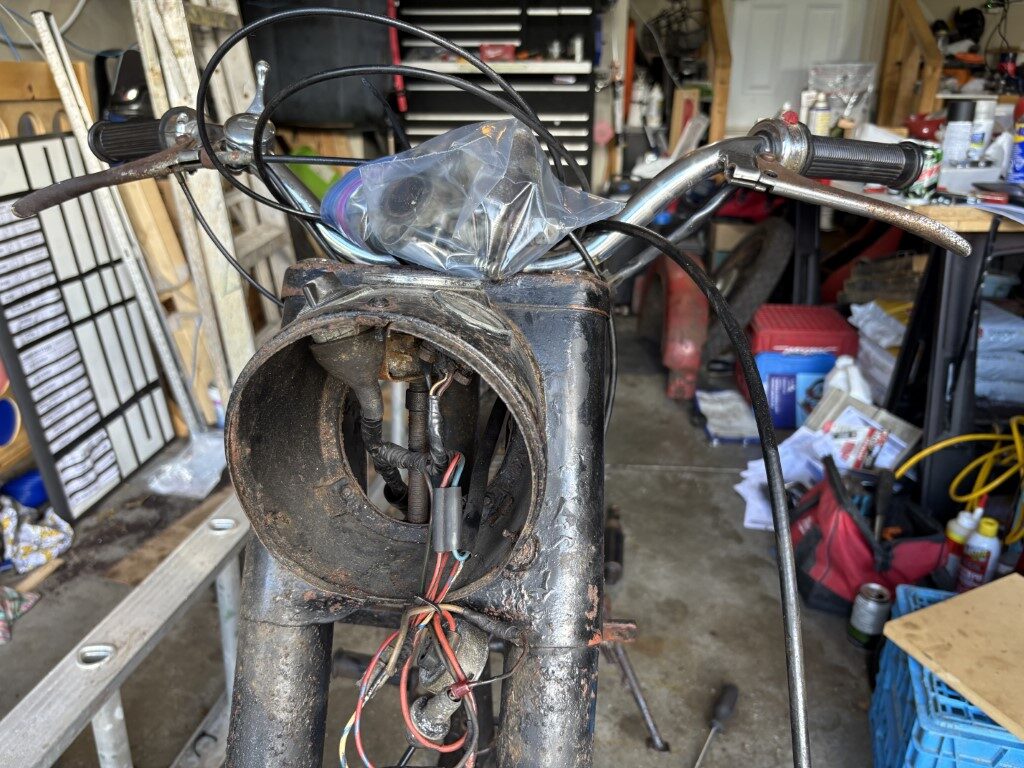
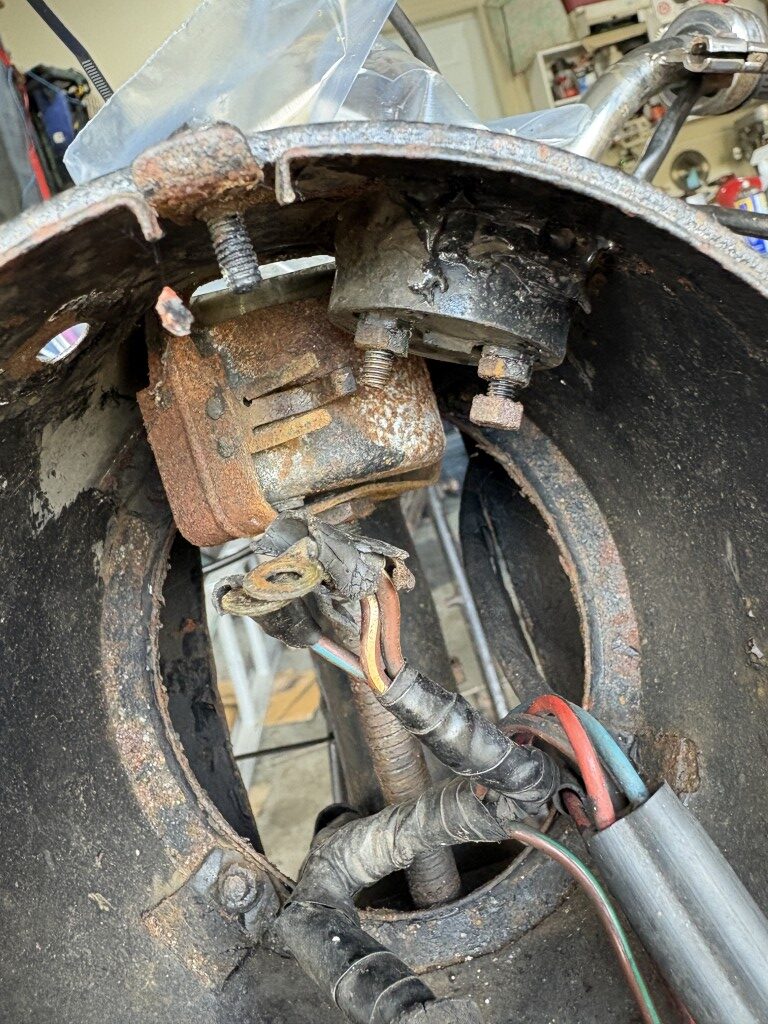
The Ammeter was in spot (C) of the headlamp but it was no longer electrically connected in the circuit (prior issues). The wires were all on one of the terminals, so I deduce that it was already causing some issues prior to storage. The unit was also put in using some type of Scottish goop. I hit it with the heat gun to create soft goop and for sure it started to peel away, but then within a few minutes the ammeter fell apart… guess it was also made of more plastic than I realized. Will be adding one of those to the shopping list :o)
The unit had 4 slot screws and nuts where (A) is shown above equally spaced around the inner ring. Had to get my neighbor over so that we had 4 hands. Two trying to keep the screw head from spinning and two to get the swivel socket on the inner nut and turn it to ultimately snap the bolts. I think all of them broke, but replacing them with small stainless steel nuts and bolts will be the repair.
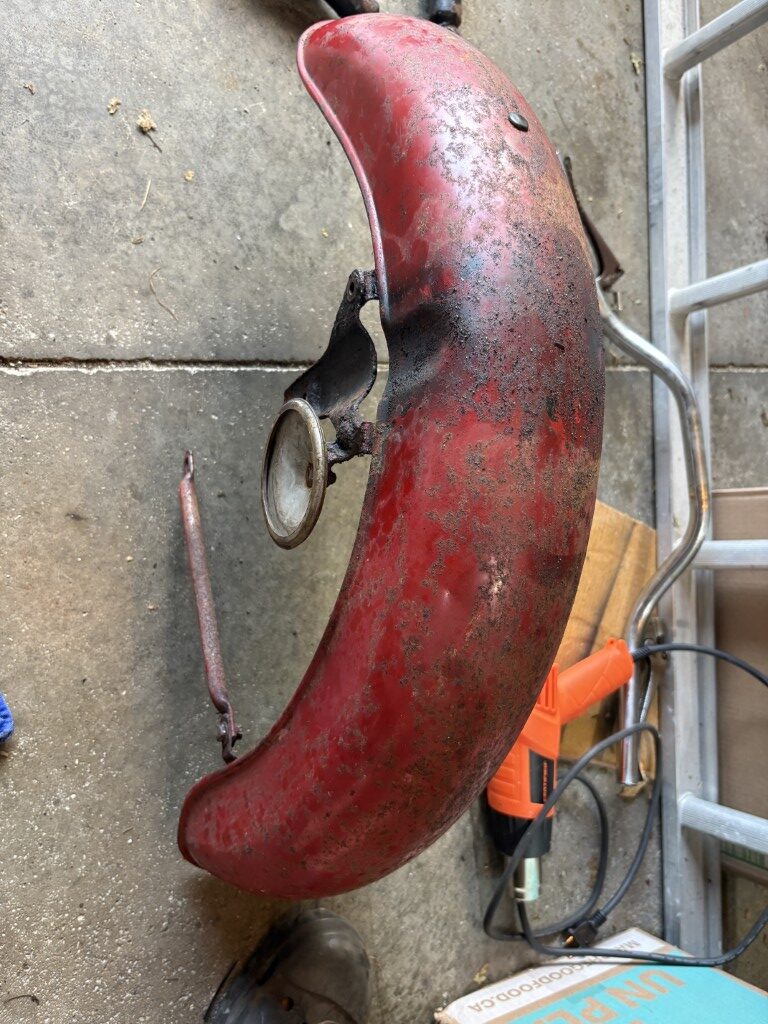
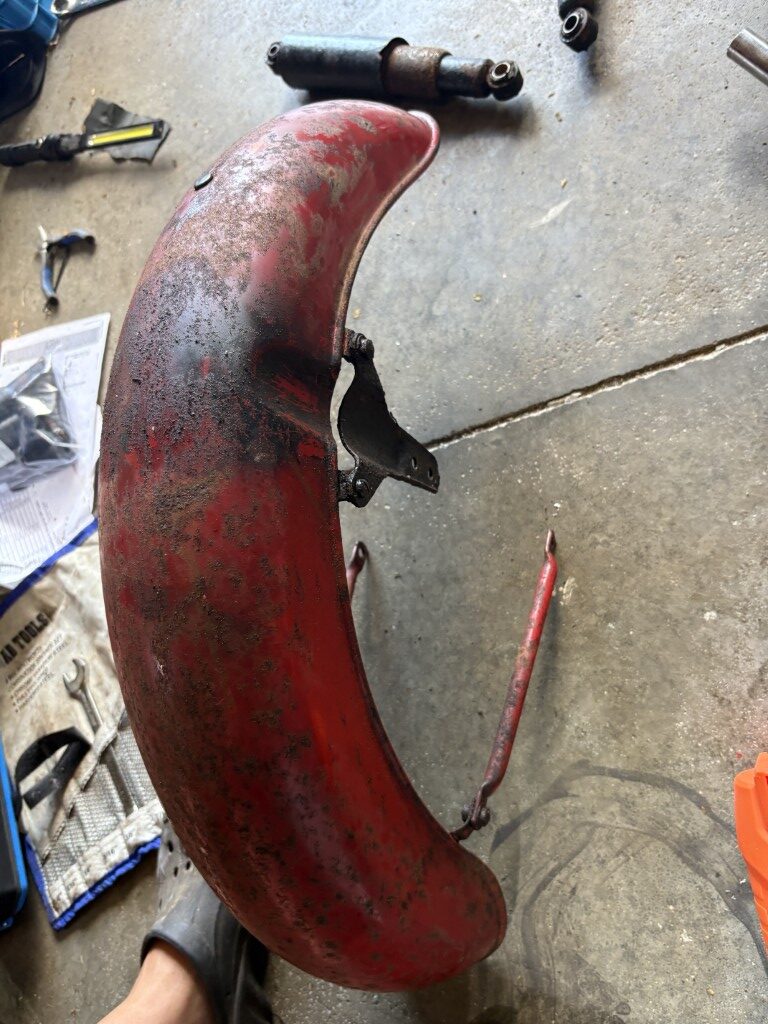
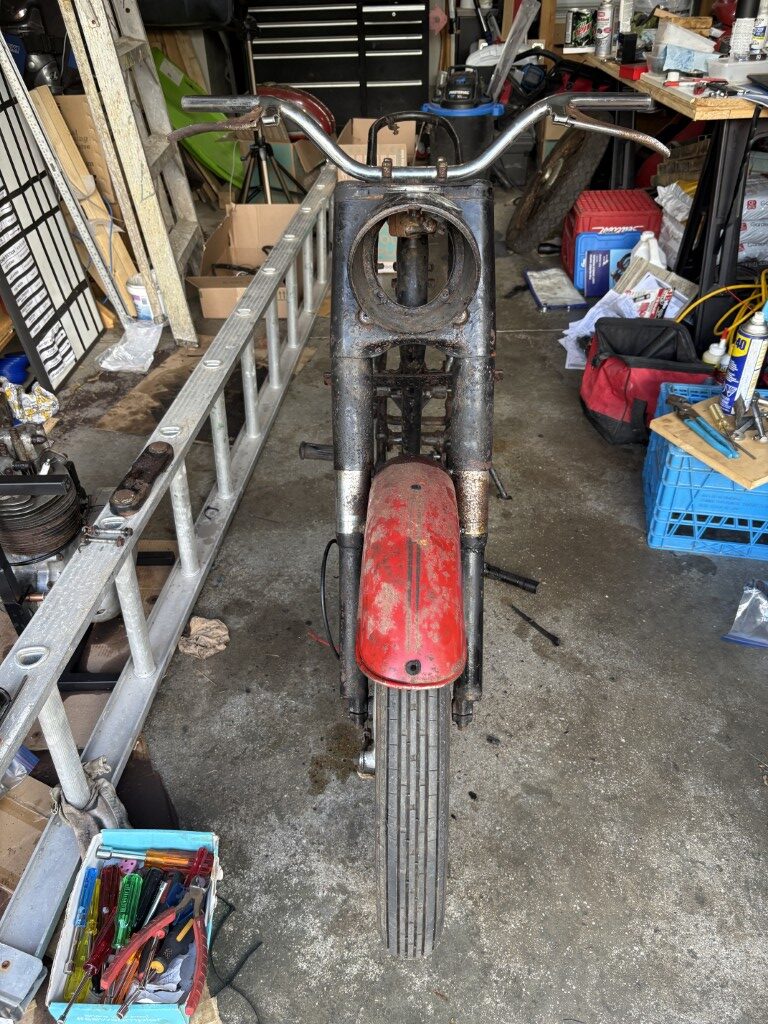
The front fender is removed and now just to remove the components before cleanup. those bolts might not survive the removal process, but are bound to be replaced in order to remove the 50+ years of rust and grime.
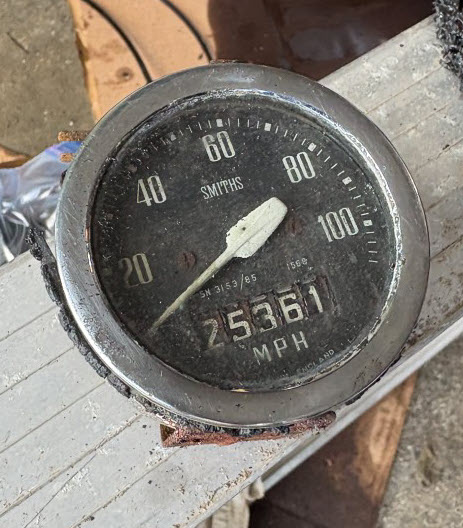
The state of the steering column lock nut above did make me aware that Willie had likely done some work to this area during his 10 years of riding fun.
If the odometer is correct and accurate then 25361 Scottish miles was put on this bike which is around 2500 per year. Not bad in the Scottish summers :o)
Off for a CVMG Breakfast in Chatham ride tomorrow, so likely trying to get the suspension removed and the rest of the steering column disassembled tomorrow afternoon. Mario told me to be ready to catch the 48 ball bearings and in the past they would put some magnets around on the floor to help catch the balls. Not too hard to replace but will see if I can get a cardboard box underneath when we start separating the steering column.
Not sure I thought I’d get this far today, but here we are. I started today with the foot pegs and pedals as a goal. The right one (gear lever) is still attached—mainly because the bolt/nut is now perfectly round. Definitely on the replacement list. I even wondered if it was reverse thread (still trying to find out), but whichever way I tried, it just sneered at me. I’ll get later to the fact that the gear lever is on the right and the brake pedal is on the left.. total opposite from all our other bikes… hmmmm. Not sure why this just due to the left side driving, but here we are.. discovery.
The brake-side foot peg and lever were a bit kinder. The foot peg nut turned out to be reverse thread (thank heavens for small mercies). The brake pedal, though, came with its own bag of tricks. One wee nut had a cotter pin that had rusted in place—took more finesse than a Glaswegian trying to eat soup with chopsticks. There is also the brake-light switch which is going to need some love and attention.. wonder if it was working in the end… at first glance I’d guess not.
Next came the sheet metal that holds the battery and assorted bits, which of course led me straight into battle with the shock absorbers. Those, in turn, demanded the fender come off, which politely insisted that the rear wheel had to come off first. This BSA clearly has a sense of humour—every step feels like being told, “Aye, you could do that… but not until ye’ve done three other jobs first.”
Looks like a bit of a bees nest in there.. but it and the brackets all came out ok.
The upper bolts for the shocks were tighter than a Scotsman’s grip on his last pound note. Just when I was about to admit defeat, my neighbour wandered by. With the two of us and a hammer (the ultimate Scottish torque wrench), the shock absorber finally waved the white flag.
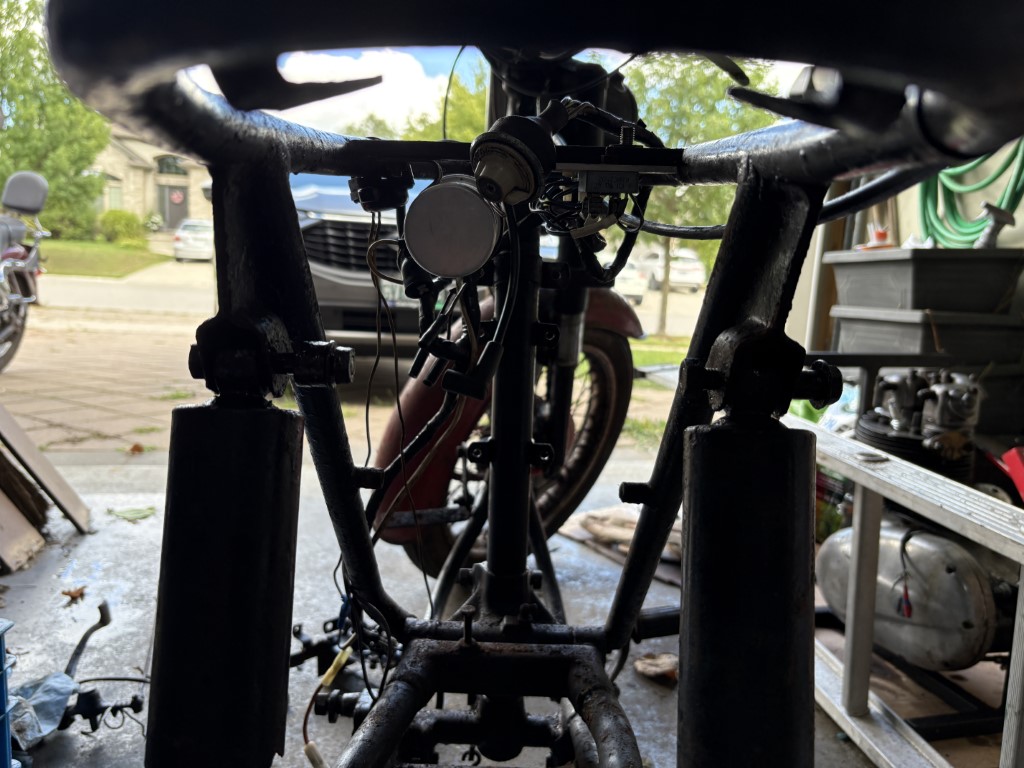
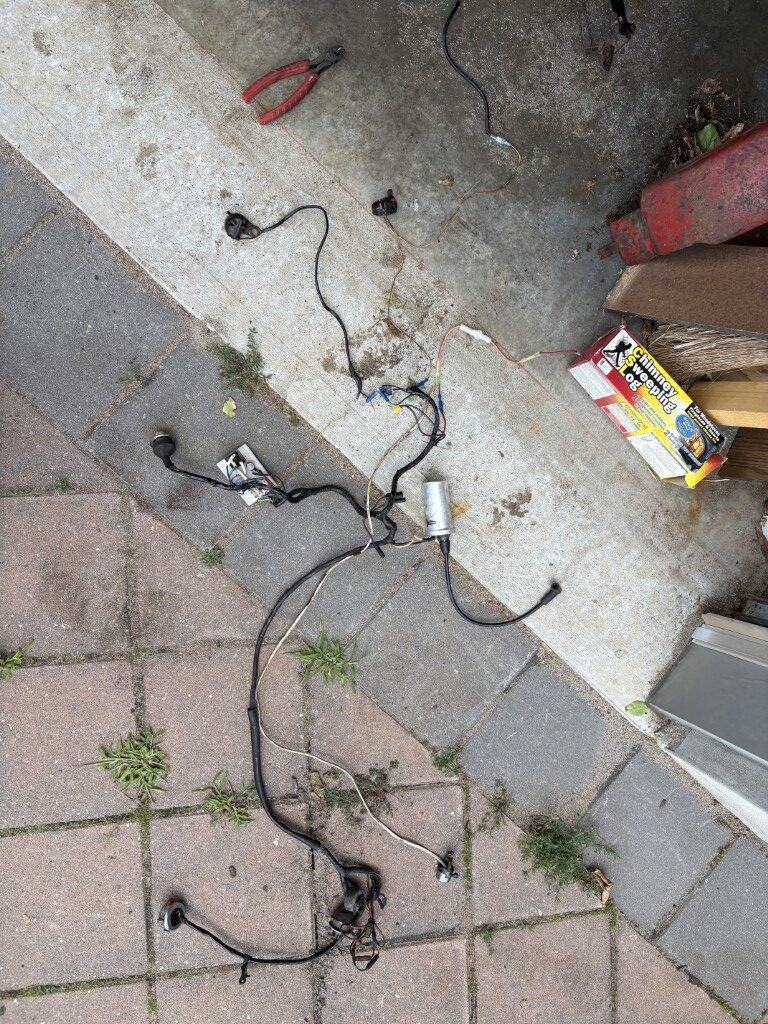
After that, I removed the wiring harness and then the electrics inside the headlight—the 1960s version of a modern fuse box, except with fewer safety standards and a lot more character. Grips and electrical connectors came off the bars to allow everything to snake through the headlamp.
Now the bike is rather bare (phew), stripped back to a skeleton. Next job is the front wheel and forks—but that’s a story for another day, once I’ve had a strong cup of tea (or perhaps a dram, depending on how the bolts behave).