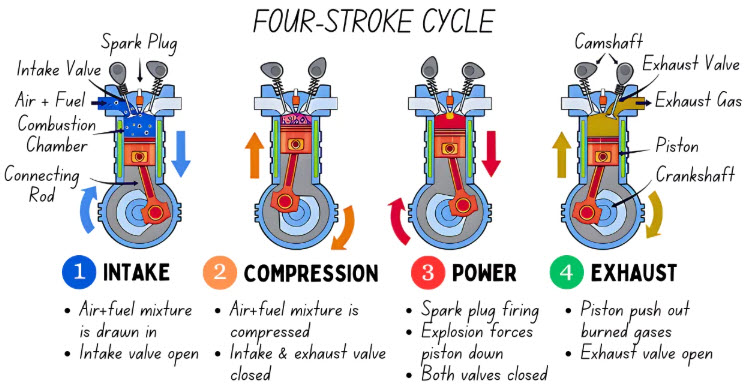
It’s a relatively simple engine (Single cylinder) and they key of course is the 3 main things:
- Fuel
- Air
- Spark
FUEL:
I started with reviewing the fuel and the tank was in reasonable shape (more to come later). Although I had bought a seal kit for the tank I had received opinions from several that it’s not as necessary as many would suggest. I have an endoscope device so I put the camera in the tank and reviewed inside. It was not too bad and since the fuel line has a filter I decided to just make sure I could turn the gas fuel on. The fuel line was quite stiff and would need replacing, but also the fuel valve was a push/pull and was obviously quite seized.
I enlisted the help of my neighbor and we got serious. With a set of grips on the valve into the tank we start to put a lot of pressure back and forth. It took a while for the first move (strength, WD40 + heatgun) and then with some back and forth it eventually was removed.
Purchased a new twist valve from Walridge Motors that came from a Triumph and along with some new fuel hose I was ready to connect the carburetor and feed it fuel (once rebuilt).
AIR:
Not much to do here… I just removed the sheet metal under the seat where the filter is installed. I need a replacement hose anyway to feed the air through the filter, but for the purposes of the initial engine run the straight intake into the carb will be fine.
Spark:
This might be the most exciting. The bike does not have the 6 vDC battery it requires. Not that a 50+ year old battery would have worked. :o). I had to review the electrical on this bike to determine what I’d need. I purchase a 6 vDC battery from Walridge as this would be likely required. Although one should potentially be able to start the bike without the battery I soon read that this bike would be more likely to start with the battery as the kick-start would not generate sufficient charge with the coil to get spark.
I took time to check all the wiring and put some modern connections where required for the battery and other areas. I also added a fuse as I noted that the wiring system did not include any fuse originally. There were two added switches not within the original schematics I had for this bike.
1. A switch on the handlebars near the clutch (thumb switch)
2. A similar switch hidden under the seat.
Turns out they were both kill switches to the starting circuit. The one on the handlebars was a convenient kill switch to stop the bike engine and under the seat was a security one as this bike has now ignition key :o). The world was much more trusting back in the Scottish lands of the 60’s.
I did have to also replace the coil as I unwrapped the electrical tape and found an interesting hole in the side of the coil that was on the bike. I can only assume it was running with this installed, but for sure it could have been causing some spark loss. I would say at this time after 50 years the oil in the coil was dried out and so the electrical readings were not ideal. Walridge motors to the rescue again.
I did pick up a new spark plug and a kit to build a new spark plug wire as on the bike the one was missing the plug cap. This was an easy build. I was concerned that the spark plug would not thread into the cylinder completely and so I was thinking I might have to chase the threads. An idea to do this was provided to put air pressure in the exhaust so that the cylinder was under positive pressure and also coat the tap in grease to help not let any filings get in the cylinder (this would be bad). However when I put the socket on and gave it a gentle extra twist the plug did start past the stuck point and then was able to go to full depth.. phewwwww.
The last key part on the electrical was the distributor and of course the points which help with spark. Ok, not help but actually are a key point. I didn’t want to move them at all as this then leads down to having to setup the timing if there is an issue. I carefully used some 400 grit sandpaper and slid it back and forth between the points to assure a good connection (remove 50 years of fine buildup). with the spark plug grounded against the engine block and hooked up to the coil I was able to kick the bike and get spark. With it hooked up I was able to open and close the points with a small screwdriver to see the spark generated when they were open (opening the points is when the coil sends the spark high voltage).
I was now ready to go…..